Marshmallow Food Recipe Easy Homemade Guide (2025)
How to make fluffy homemade marshmallows with our simple marshmallow food recipe. Perfect for s'mores, hot chocolate, and creative desserts!


If you’ve ever wondered how to make those pillowy-soft, melt-in-your-mouth marshmallows at home, you’re in the right place. This comprehensive marshmallow food recipe guide will walk you through everything you need to know about creating delicious homemade marshmallows that taste far superior to store-bought versions.
Making marshmallows from scratch might sound intimidating, but with the right ingredients and techniques, you’ll discover it’s surprisingly simple. Whether you want classic vanilla marshmallows for your hot cocoa, flavored varieties for gifts, or gourmet treats for special occasions, this marshmallow food recipe delivers perfect results every time.
Why Make Homemade Marshmallows?
Before diving into the recipe, let’s explore why homemade marshmallows are worth the effort.
Store-bought marshmallows often contain artificial flavors, preservatives, and high fructose corn syrup. When you make your own marshmallow food recipe at home, you control every ingredient. You’ll taste the difference immediately – homemade versions are fluffier, more flavorful, and have a superior texture.
Additionally, homemade marshmallows make impressive gifts. Package them in decorative boxes or jars, and you have a thoughtful present for holidays, birthdays, or hostess gifts. They’re also perfect for elevating desserts, from gourmet s’mores to elaborate hot chocolate bars.
Essential Ingredients for Your Marshmallow Food Recipe
Creating the perfect marshmallow requires just a handful of simple ingredients.
Gelatin forms the backbone of any marshmallow food recipe. Unflavored gelatin powder gives marshmallows their characteristic bouncy texture. You’ll need about three packets for a standard batch.
Sugar provides sweetness and structure. Granulated white sugar works best, though you can experiment with alternatives for different flavors.
Corn syrup prevents crystallization and adds smoothness. Light corn syrup is traditional, though some bakers substitute honey or glucose syrup.
Water activates the gelatin and dissolves the sugar. You’ll use it in two stages during preparation.
Vanilla extract adds classic flavor. Pure vanilla extract delivers the best taste, though you can customize with almond, peppermint, or other extracts.
Salt enhances flavors and balances sweetness. Just a pinch makes a noticeable difference.
Powdered sugar and cornstarch create the coating that prevents sticking. Mix them in equal parts for the perfect dusting.
Equipment You’ll Need
Having the right tools makes this marshmallow food recipe much easier to execute.
A stand mixer with a whisk attachment is essential. The mixture requires extensive whipping, and hand mixers struggle with the dense consistency. A candy thermometer ensures your sugar syrup reaches the correct temperature – precision matters here.
You’ll also need a medium saucepan for cooking the sugar mixture, a 9×13 inch baking pan for setting the marshmallows, and a sharp knife or pizza cutter for slicing once they’re ready.
Classic Vanilla Marshmallow Food Recipe
Now let’s get into the detailed recipe for making perfect homemade marshmallows.
Ingredients:
- 3 packets unflavored gelatin (about 3 tablespoons)
- 1 cup cold water, divided
- 1½ cups granulated sugar
- 1 cup light corn syrup
- ¼ teaspoon salt
- 2 teaspoons vanilla extract
- ½ cup powdered sugar
- ½ cup cornstarch
Instructions:
Start by preparing your pan. Combine the powdered sugar and cornstarch in a small bowl. Grease your baking pan with cooking spray, then generously dust it with the powder mixture, tapping out any excess.
In your stand mixer bowl, pour half a cup of cold water and sprinkle the gelatin over it. Let this bloom for about ten minutes while you prepare the sugar syrup. The gelatin will absorb the water and soften.
In your saucepan, combine the remaining half cup of water with sugar, corn syrup, and salt. Place over medium heat and stir until the sugar dissolves completely. Once dissolved, stop stirring and let it come to a boil. Clip your candy thermometer to the side of the pan.
Cook the mixture until it reaches 240°F on your thermometer. This temperature is crucial – it’s the soft-ball stage that gives marshmallows their perfect texture. Watch carefully as temperatures can rise quickly near the end.
When the syrup reaches temperature, remove it from heat immediately. Turn your stand mixer to low speed and carefully pour the hot syrup into the gelatin mixture in a slow, steady stream. Aim for the side of the bowl to avoid splattering.
Once all the syrup is incorporated, gradually increase the mixer speed to high. Beat the mixture for ten to twelve minutes. You’ll notice it transforms from thin and translucent to thick, white, and glossy. It should roughly triple in volume and hold soft peaks.
Add your vanilla extract during the final minute of mixing. The mixture should be thick enough that it slowly falls from the whisk in ribbons.
Pour the marshmallow mixture into your prepared pan, using a greased spatula to spread it evenly. The mixture will be sticky, so work quickly. Dust the top with more of your powdered sugar and cornstarch mixture.
Let the marshmallows set uncovered at room temperature for at least four hours, preferably overnight. Don’t refrigerate them – they need to dry out slightly.
Cutting and Storing Your Marshmallows
Once set, turn the marshmallow slab out onto a cutting board dusted with your powder mixture.
Use a sharp knife, pizza cutter, or cookie cutters to create your desired shapes. For clean cuts, dust your cutting tool with the powder mixture and wipe it clean between cuts. Toss each cut marshmallow in the powder mixture to coat all sides, which prevents sticking.
Store your finished marshmallows in an airtight container at room temperature, separated by layers of parchment paper. They’ll stay fresh for up to two weeks, though they’re unlikely to last that long.
Creative Flavor Variations
Once you’ve mastered the basic marshmallow food recipe, experiment with exciting variations.
Chocolate marshmallows are simple – add three tablespoons of cocoa powder to the gelatin mixture before beating. For peppermint marshmallows, replace vanilla with peppermint extract and add a few drops of red food coloring for festive appeal.
Coffee marshmallows work beautifully in mocha drinks. Dissolve two tablespoons of instant espresso powder in the hot syrup before adding it to the gelatin. Fruit-flavored marshmallows can be made by replacing vanilla with fruit extracts like strawberry, raspberry, or orange, and adding corresponding food coloring.
For toasted coconut marshmallows, fold in half a cup of toasted coconut flakes during the final minute of mixing. The texture becomes interesting and the flavor sophisticated.
Swirled marshmallows look impressive. Divide your mixture between two bowls after beating, color each differently, then alternate spoonfuls in your pan and swirl with a knife.
Troubleshooting Common Marshmallow Problems
Even experienced bakers encounter issues with this marshmallow food recipe sometimes.
If your marshmallows are too sticky, you likely didn’t let them set long enough or the sugar syrup didn’t reach the correct temperature. Always use a reliable candy thermometer and give them adequate drying time.
Grainy texture indicates sugar crystallization. This happens if you stir the syrup after it starts boiling or if sugar crystals on the pan sides fall back into the mixture. Keep a pastry brush and water handy to wash down the sides.
Flat marshmallows that don’t fluff up properly usually mean the mixture wasn’t beaten long enough. Give it the full twelve minutes at high speed until it’s thick, glossy, and holds its shape.
If your marshmallows are too hard, the syrup was cooked too high. Even five degrees over 240°F can make a significant difference in final texture.
Creative Ways to Use Your Marshmallow Food Recipe
Homemade marshmallows elevate countless desserts and drinks.
Obviously, they’re perfect for s’mores, where their superior flavor and texture shine. Try them in hot chocolate – they melt more smoothly than store-bought versions and add rich, creamy sweetness.
Rice crispy treats become gourmet when made with homemade marshmallows. The texture is chewier and the flavor more complex. Marshmallow frosting is another option – beat marshmallows with softened butter for a unique cake topping.
Cut marshmallows into small cubes and fold them into cookie dough before baking for pockets of gooey sweetness. Or dip them in melted chocolate and roll in crushed cookies, nuts, or sprinkles for elegant party treats.
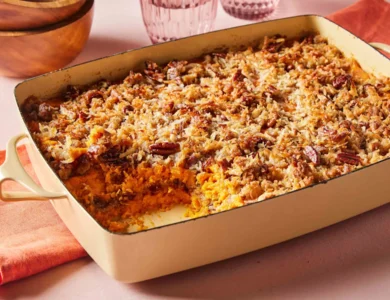
Sweet potato casserole topped with homemade marshmallows becomes a showstopper at holiday dinners. The marshmallows brown beautifully and add just the right amount of sweetness.
Health Considerations and Dietary Modifications
While marshmallows are an indulgent treat, you can make some adjustments.
Traditional marshmallow food recipes aren’t suitable for vegetarians or vegans due to gelatin, which comes from animal collagen. However, you can substitute with agar-agar, though the texture will differ slightly. Use about two tablespoons of agar powder in place of three packets of gelatin.
For lower-sugar versions, artificial sweeteners don’t work well in this application because sugar provides structure, not just sweetness. You might experiment with reducing the sugar by up to one-third, though results won’t be quite as light and fluffy.
Those avoiding corn syrup can substitute honey, though it will impart flavor and may affect texture slightly. Golden syrup or glucose syrup work even better as alternatives.
Remember that marshmallows are treats meant for occasional enjoyment. A standard homemade marshmallow contains about 30 calories and 6 grams of sugar.
Professional Tips for Perfect Results
These insider tips will help you achieve bakery-quality marshmallows every time.
Temperature accuracy is everything. Invest in a quality candy thermometer and test it in boiling water before using – it should read exactly 212°F. If it’s off, adjust your target temperature accordingly.
Humidity matters more than you might think. Making marshmallows on very humid days can result in sticky, slow-to-set treats. Choose a dry day when possible, or run a dehumidifier in your kitchen.
Don’t rush the setting time. While four hours is minimum, overnight yields better texture. The marshmallows need to dry out slightly on the surface for easier handling.
Use gel food coloring instead of liquid if you’re adding color. Liquid can thin the mixture and affect texture. Gel colors are concentrated, so you need very little.
Keep everything ready before you start cooking the syrup. Once it reaches temperature, you need to work quickly. Have your mixer running on low, ready to receive the hot syrup.
Conclusion
Mastering this marshmallow food recipe opens up a world of culinary possibilities. From classic vanilla to creative flavor combinations, homemade marshmallows are surprisingly simple to make and infinitely more delicious than store-bought versions.
The key to success lies in precise temperature control, adequate beating time, and patience during the setting process. Once you’ve made your first batch, you’ll understand why so many bakers never go back to store-bought marshmallows.
Whether you’re creating gourmet s’mores, elevating your hot chocolate game, or crafting thoughtful homemade gifts, this marshmallow food recipe delivers consistent, impressive results. The soft, fluffy texture and pure flavor will make you wonder why you waited so long to try making them yourself.
So gather your ingredients, set up your stand mixer, and prepare to amaze your friends and family with these pillowy homemade treats. Once you’ve experienced the satisfaction of creating perfect marshmallows from scratch, you’ll find yourself making batch after batch, experimenting with flavors and sharing your delicious creations with everyone you know.
Happy marshmallow making!
FAQs
Q Can I make marshmallows without a candy thermometer?
While possible, it’s not recommended. Visual cues are unreliable. However, if necessary, test the syrup by dropping a small amount into cold water. At the correct temperature, it should form a soft ball that flattens when removed.
Q Why are my marshmallows deflating?
This usually happens if the sugar syrup didn’t reach the correct temperature or if the mixture wasn’t beaten long enough. The marshmallows need sufficient structure to hold their shape after setting.
Q Can I make marshmallows ahead of time?
Absolutely. Homemade marshmallows keep well for up to two weeks in an airtight container. They’re perfect for making ahead for parties or gifts.
Q Do I have to use corn syrup?
Corn syrup prevents crystallization, making the texture smooth. Substitutes like honey or golden syrup work but may slightly alter flavor and texture.
Q Can I freeze marshmallows?
It’s not recommended. Freezing affects the texture, making them denser and less fluffy when thawed. Room temperature storage is best.
Read More: Simple Alfredo Pasta Recipe – Creamy & Quick (2025)