Did you know that Photoshop can be used to make animations? We’ll show you how to do it. Have you ever wished you could modify a whole subject’s movements in Photoshop in a lifelike, puppet-like manner? We’ll teach you not only how to do it, but also how to convert it into an entertaining animation.
The Puppet Warp Tool is one of Photoshop’s newest warp tools. Although most warp tools operate in a similar manner, the Puppet Warp Tool has a unique feature that aids in the creation of lifelike physical movement.
Photoshop’s Puppet Warp: What Is It?
The name offers us a hint as to what the Puppet Warp Tool can do, but let’s go through what the Puppet Warp is in more depth. Consider a puppet on a string whose limbs are connected by the strings. Those linkages allow the puppet’s body to move more organically than a human’s, and the Puppet Warp Tool operates in a similar way to change a picture.
Read More: Adobe illustrator Crackeado 25.0.0.60 Dowload Gratis
The Puppet Warp Tool in Photoshop, like many other warp tools, creates a mesh around the subject that lets you to push and pull the subject to your desired movements. Puppet Warp, in addition to the triangular mesh, allows you to make joints by pinning pins to any section of the mesh.
Photoshop uses these joints to generate realistic warping that mimics the movements of a human body.
How to Use Photoshop’s Puppet Warp Tool
To begin, select an appropriate image. The effect is strongest when the body of a human or animal is clearly separated from the background. Open your image in Photoshop once you’ve decided on it. By right-clicking the image and selecting Duplicate Layer from the Layers Panel, you may duplicate the layer.
The first step is to choose a topic. While you may manually choose it using a variety of approaches, you can use the Content-Aware Fill to auto-select the topic if your chosen image has an obvious subject contrasted against a neutral background.
Select the Rectangular Marquee Tool, or another selection tool, with your duplicated layer selected. Select > Subject from the menu. Running ants will now surround your topic, separating it from the background. Right-click the image and select Content-Aware Fill with your subject selected. A new window will appear, with two comparison windows.
You’ll see that your original image on the left has a green screen sampling around the neutral background of your topic in the pop-up. The Content-Aware Fill results will be displayed in the Preview window on the right.
If your Preview screen still shows a faint outline of where your subject used to sit, increase the Feather box at the top by 10 px, and then click Expand. The outline will be eliminated, and the image will appear more natural without the subject.
Once you’re satisfied with the result, click Apply or OK. Even when your topic has vanished, the running ants from your selection will still be visible. Do not deselect because the selected shape will be used again in the next stage.
Drag the cloned layer over your recently isolated subject layer in the Layers Panel. Then, with the copied layer selected, go to the bottom of the layers panel and click the Add Layer Mask button. This generates a mask to eliminate the backdrop from your topic, which is the inverse of Content-Aware Fill.
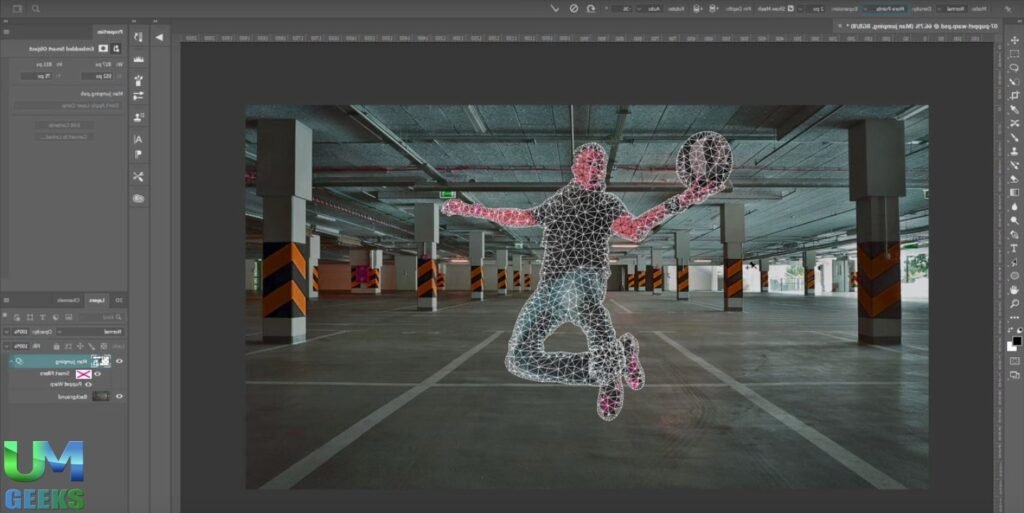
This gives you one layer with an isolated topic and another with simply a visible background, as well as your original image as its own layer, which will be useful later. Right-click the masked layer and select Convert to Smart Object from the context menu. Then select Edit > Puppet Warp from the main menu. This creates a triangle mesh around your isolated topic, which allows you to warp it.
Read More: Internet Download Manager Crackeado Download 2022
How to Use Photoshop to Animate Your Puppet
You can utilise your puppet warp to build an animation that you can turn into a GIF after you’ve finished it. This can be purely for entertainment rather than for a serious animation, but your warping talents may enable you to produce a smooth movement for a longer animation.
Highlight the masked backdrop layer and the isolated subject layer in your Layers Panel, then combine the two layers together by right-clicking one of the two highlighted layers and selecting Merge Layers. Your original image should be on the bottom layer, and your new warped image should be on the top layer.
To access Photoshop’s animation timeline, go to Window > Timeline. This will add a frame to one of your layers in the timeline. Click the Convert to Frame Animation button in the timeline panel’s bottom left corner, then select Make Frames From Layers from the timeline menu on the right.
Your other layer(s) will appear in the timeline panel as a result of this action. To set the timing for all of your layers in the animation timeline, click the arrow under each frame. We recommend 0.2 for each frame for a rapid animation. To view how your animations look, click Play on the timeline.
You can save it once you’re satisfied with the results. Select File > Export > Save For Web (Legacy) from the File menu. The majority of the options should be set to your liking. Make sure your file is saved as a GIF, as the other formats don’t support moving images.